
There’s something especially annoying about cleaning a shower.
You scrub the tiles, rinse everything down, and step back expecting that fresh, sparkling finish—only to notice cloudy glass, dull fixtures, or grout that somehow still looks dirty.
The problem is that showers deal with several types of buildup at once. You have soap residue, body oils, hard-water deposits, damp corners, hair, and everyday bathroom grime all sharing the same small space.
And if you wait until the shower looks dirty before cleaning it, the job becomes much harder.
The good news is that you don’t need to spend your entire weekend scrubbing. A few simple habits, the right tools, and a sensible cleaning order can make the whole process much easier.
Here are 15 easy shower-cleaning hacks that can help you get your bathroom feeling fresh again—and keep it that way.
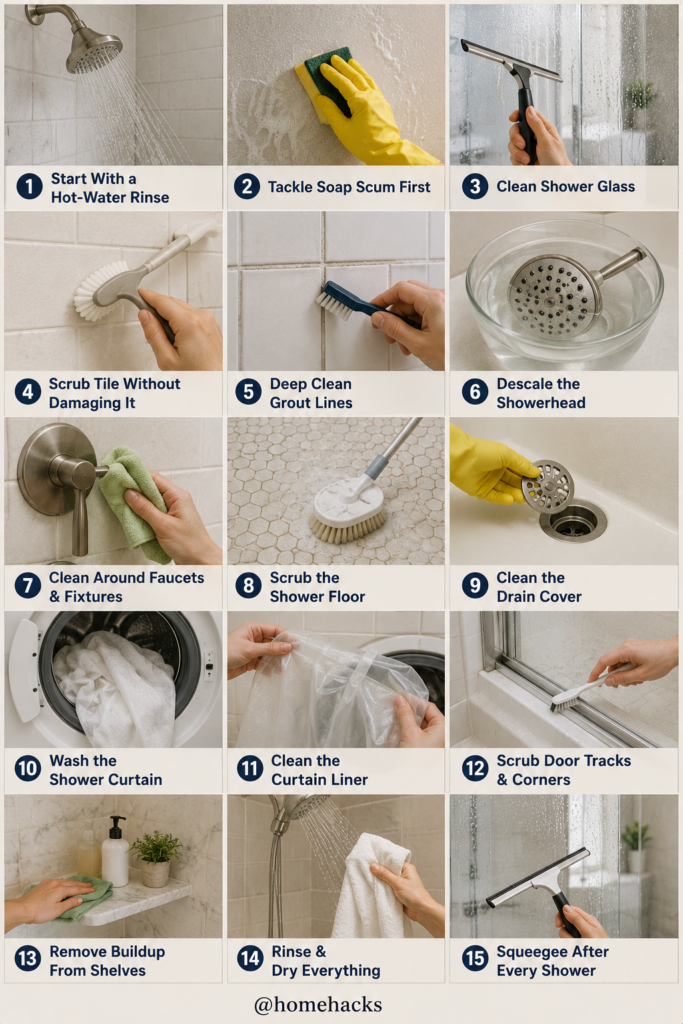
1. Start With a Warm-Water Rinse
Before you start scrubbing, give the shower surfaces a rinse with warm water.
It sounds almost too simple to count as a cleaning hack, but it helps loosen fresh soap residue and surface dirt.
I like doing this before applying any cleaner because I’m not wasting product on loose debris that could have been rinsed away first.
Remove shampoo bottles, razors, soap dishes, and anything else sitting around the shower too. Starting with an empty space makes cleaning so much easier.
Just be careful with very hot water. Warm water is enough—you don’t need boiling water or anything extreme.
2. Tackle Soap Scum Before It Gets Thick
Soap scum is one of those things that’s barely noticeable at first.
Then one day you look at the shower wall from the right angle and wonder where that cloudy film came from.
The easiest solution is regular cleaning.
Use a cleaner that’s appropriate for your shower surface and follow its directions. Give it the recommended contact time rather than spraying and immediately wiping it away.
Then use a soft, non-scratch sponge or microfiber cloth to loosen the buildup.
For stubborn areas, you may need to repeat the process instead of scrubbing aggressively.
Your tiles and shower finish will thank you.
3. Clean Shower Glass in Sections
Glass shower doors look incredible when they’re clean.
Unfortunately, they also show practically every drop of water.
Instead of trying to clean the entire door at once, work in smaller sections.
Apply an appropriate glass or shower cleaner, then wipe the area with a microfiber cloth before moving on.
Finish with a clean squeegee or dry microfiber cloth.
Cleaning in sections helps prevent the cleaner from drying on the glass before you can remove it.
And if your glass has a special protective coating, check the manufacturer’s instructions before using acidic or abrasive products.
4. Scrub Tile Without Going Overboard
Bathroom tile is generally durable, but that doesn’t mean you should attack it with the roughest scrubber you can find.
Start gently.
Use a soft sponge, microfiber cloth, or non-scratch brush with a cleaner that’s compatible with your tile.
Pay extra attention to the lower part of the shower wall, where soap and water tend to collect.
If you have natural stone such as marble, travertine, or limestone, be especially careful. Acidic cleaners—including vinegar—can damage some stone surfaces.
When you’re unsure, check the manufacturer’s care recommendations.
5. Give the Grout Some Attention
Even when the tiles look clean, dirty grout can make the whole shower look tired.
A small grout brush is incredibly useful here.
Apply a grout-safe cleaner, allow it to work according to the instructions, and gently scrub the grout lines.
Work on a small area at a time.
You don’t need to scrub every grout line every time you clean the shower. Focus on the areas that collect the most buildup, especially around corners and near the floor.
If grout remains deeply stained, damaged, cracked, or repeatedly develops mold, the problem may need more than routine cleaning.
6. Descale the Showerhead
When a showerhead starts spraying in strange directions or the water pressure seems weaker than usual, mineral buildup may be part of the problem.
Check the manufacturer’s cleaning instructions first.
For removable showerheads, you may be able to clean the nozzles and soak compatible parts using the recommended descaling method.
For fixed showerheads, follow a method that’s safe for the finish and internal components.
Be particularly careful with specialty finishes such as brass, matte black, bronze, or coated fixtures, since harsh cleaners can damage them.
Once clean, you may notice the spray pattern improves too.
7. Clean Around Faucets and Fixtures
Faucets, handles, and shower controls collect fingerprints, soap residue, and water spots surprisingly quickly.
A soft microfiber cloth is usually your best friend here.
Use a cleaner appropriate for the fixture’s finish, wipe gently, and dry afterward.
Don’t forget around the base of handles and the narrow spaces where fixtures meet the wall.
A small soft brush can help with awkward areas.
Avoid using aggressive scrubbers on polished or specialty finishes—they can turn a small water spot problem into permanent scratches.
8. Scrub the Shower Floor Last
I prefer cleaning the shower floor after the walls.
Why?
Because everything you’re rinsing from the walls ends up there anyway.
Once the upper surfaces are finished, rinse away loose debris and apply a floor-safe cleaner.
Use a suitable brush to clean around textured areas and grout lines.
Pay particular attention to corners and around the drain.
Rinse thoroughly when you’re finished.
And don’t leave the floor covered in slippery cleaning residue. That’s one cleaning shortcut definitely not worth taking.
9. Don’t Forget the Drain Cover
The drain is probably nobody’s favorite part of shower cleaning, but ignoring it doesn’t make it disappear.
Hair, soap, and residue collect around the drain cover surprisingly quickly.
Put on gloves and remove visible hair and debris.
If your drain cover is designed to be removed, follow the manufacturer’s instructions before taking it apart.
Clean around the cover using a suitable brush and rinse the area thoroughly.
If your shower is draining slowly even after visible debris has been removed, you may need to address a deeper blockage rather than repeatedly pouring random products down the drain.
And never mix different drain-cleaning chemicals.
10. Wash the Shower Curtain
If you have a fabric shower curtain, check the care label.
Many fabric curtains can be machine washed, but don’t assume yours can.
Washing the curtain occasionally removes dust, bathroom residue, and the slightly stale smell fabric can develop in a humid room.
Once clean, hang it back up properly so it can dry completely.
It’s amazing how much fresher the entire bathroom feels when the shower curtain is clean.
11. Clean the Curtain Liner Too
The liner usually needs more attention than the decorative curtain because it’s constantly exposed to water.
Check its care instructions before cleaning.
Some washable liners can be cleaned and reused, while others eventually need replacing when they’re damaged or no longer clean up properly.
The biggest everyday habit is simple:
Don’t leave the liner bunched up while wet.
Spread it out after showering so it has a better chance to dry.
That tiny habit can make a noticeable difference.
12. Scrub Door Tracks and Corners
Sliding shower-door tracks are masters at hiding grime.
Water, soap, hair, and dirt settle into those narrow channels, and they’re easy to overlook during regular cleaning.
Use a small brush to loosen buildup from tracks and corners.
A microfiber cloth wrapped around a narrow tool can help reach tight spaces, provided you don’t damage the track or seals.
Avoid flooding tracks with excessive water, especially if drainage is poor.
While you’re there, check the seals around the door too.
13. Remove Buildup From Shelves and Bottles
Sometimes the shower itself isn’t what looks dirty.
It’s everything sitting inside it.
Pick up your shampoo bottles and look underneath them.
You’ll often find rings of soap, water, and product residue.
Remove everything from shower shelves and clean the surface properly.
Wipe the bottoms of bottles before putting them back.
Throw away empty containers and anything you no longer use.
I also try not to keep six half-empty bottles sitting in the shower. Fewer products make the space easier to clean and instantly make it look more organized.
14. Rinse and Dry Everything
This step makes a bigger difference than you’d expect.
Once you’ve finished cleaning, rinse away any remaining product according to its instructions.
Then dry the glass, fixtures, and other suitable surfaces with a clean microfiber cloth or squeegee.
Why bother drying something that’s designed to get wet?
Because leaving droplets behind can contribute to visible water spots and mineral deposits as the water evaporates.
Drying also gives the shower that finished, freshly cleaned appearance.
15. Squeegee After Every Shower
If you only adopt one habit from this entire list, make it this one.
Keep a small squeegee inside the shower.
When you’re finished showering, spend about a minute removing excess water from the glass and, where practical, smooth tiled surfaces.
You don’t need to make everything perfectly dry.
You’re simply reducing the amount of water sitting around afterward.
It makes regular cleaning easier and can reduce the buildup of visible water spots.
Once it becomes part of your routine, you barely think about it.
The Cleaning Order That Makes Everything Easier
I used to clean whatever looked dirtiest first. That usually meant cleaning the shower floor—and then getting it dirty again while rinsing the walls.
Now I work roughly from top to bottom.
First, remove everything from the shower.
Then clean the showerhead and upper walls.
Move to glass, tiles, grout, fixtures, shelves, and door tracks.
Clean the floor and drain area toward the end.
Finally, rinse and dry.
It’s a small change, but it prevents you from repeatedly cleaning the same areas.
A Simple Shower-Cleaning Kit
You really don’t need fifteen different bottles.
For most routine cleaning, I like keeping a small bathroom caddy with a few basics:
- Microfiber cloths
- A non-scratch sponge
- Small grout brush
- General bathroom cleaner suitable for your surfaces
- Glass cleaner if appropriate
- Shower squeegee
- Cleaning gloves
Specialty surfaces may require specialty products, but the goal isn’t to own every cleaner in the store.
It’s to use the right cleaner for the surface you’re actually cleaning.
Be Careful With Popular DIY Cleaning Hacks
Pinterest is full of homemade cleaning recipes, but more ingredients don’t necessarily make a cleaner better.
Never randomly mix household cleaning products.
In particular, never mix bleach with vinegar or other acids, ammonia, or other cleaners. Dangerous gases can be produced.
If you’ve already used one cleaning product and want to switch to another, follow the label instructions and rinse appropriately first.
Also remember that vinegar isn’t universally safe just because it’s commonly recommended online. Acidic products can damage certain stone, grout, finishes, and specialty surfaces.
When in doubt, use the manufacturer’s recommended cleaning method.
How Often Should You Clean Your Shower?
You don’t necessarily need to deep clean it every few days.
The easiest routine is to do tiny jobs frequently.
After showering, squeegee excess water and leave the shower arranged so it can dry.
Regularly wipe obvious soap residue and clean frequently touched fixtures.
Then give the shower a more thorough cleaning as needed based on how quickly buildup appears in your household.
Homes with hard water may notice mineral deposits much faster than homes with softer water.
The goal isn’t to follow a perfect schedule. It’s to clean small problems before they become difficult ones.
Ventilation Matters Too
Cleaning isn’t the only part of keeping a shower fresh.
Moisture needs somewhere to go.
Use your bathroom exhaust fan during and after showering according to its instructions, and open a window when appropriate and safe.
Allow towels, shower curtains, and bath mats to dry properly instead of leaving them damp and bunched together.
If you’re constantly dealing with excessive moisture, persistent mold, or damaged surfaces, cleaning alone may not solve the underlying issue.
Sometimes the real problem is ventilation, a leak, or moisture getting somewhere it shouldn’t.
Final Thoughts
A clean shower doesn’t require hours of aggressive scrubbing.
Most of the work becomes much easier when you stop letting small amounts of buildup turn into big ones.
Rinse away loose residue. Give appropriate cleaners time to work. Use gentle tools. Pay attention to grout, tracks, drains, bottles, and fixtures—not just the obvious walls.
Then finish by drying the glass and keeping a squeegee nearby.
Those tiny habits are what make the biggest difference.
Because the best shower-cleaning hack isn’t finding some magical mixture that removes six months of grime in thirty seconds.
It’s making sure you never have six months of grime to deal with in the first place.