
Fresh ginger is one of those ingredients that always seems useful to have around. It adds warmth and flavor to stir-fries, curries, soups, teas, marinades, smoothies, and baked dishes.
But here’s the fun part: you can grow ginger at home from a fresh piece of ginger rhizome.
You don’t need a huge vegetable garden, either. Ginger grows beautifully in wide containers, making it a great choice for patios, balconies, greenhouses, and sunny indoor spaces.
With warmth, patience, good soil, and the right watering routine, one healthy piece of ginger can eventually develop into a much larger cluster of fresh rhizomes.
Here’s how to get started.
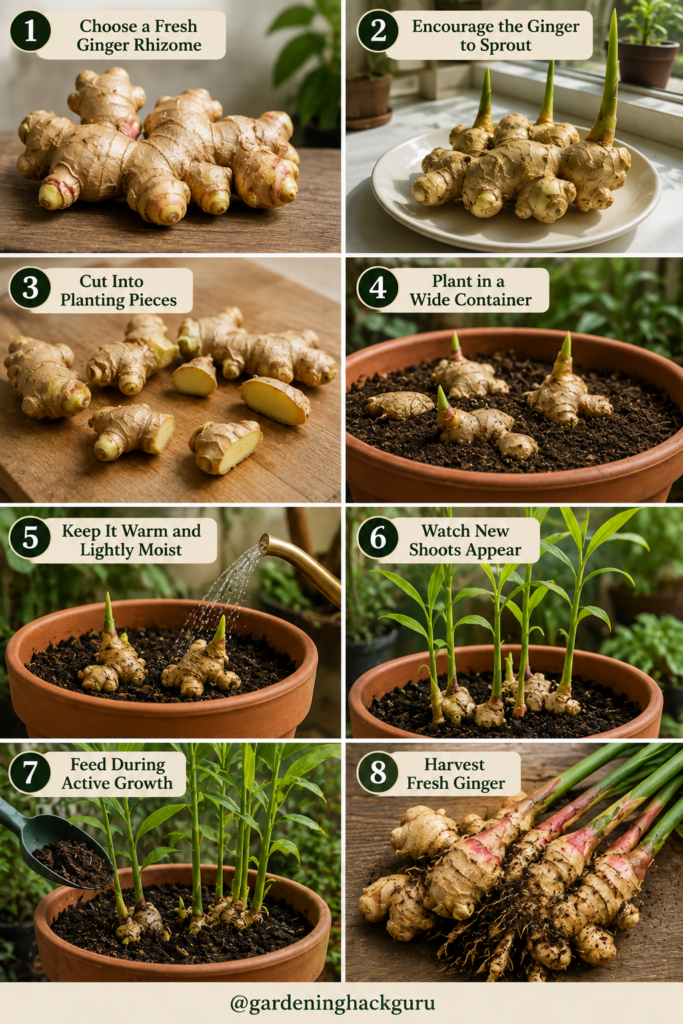
🌱 1. Choose the Right Ginger
Your ginger-growing project begins at the grocery store, farmers market, garden center, or nursery.
Look for a fresh ginger rhizome that is:
- Firm and plump
- Free from mold or major damage
- Not badly shriveled
- Showing several visible growth buds or “eyes”
The small bumps on the rhizome are where new shoots can eventually emerge.
If you can find ginger specifically sold for planting, that’s often the easiest option because some grocery-store ginger may have been treated or stored in ways that slow sprouting.
Choose a chunky rhizome with several healthy-looking sections rather than a thin, dried-out piece.
💧 2. Encourage Your Ginger to Sprout
Unlike some popular social-media images, you don’t need to keep ginger permanently submerged in a jar of water.
Ginger is a rhizome, and prolonged submersion can encourage rot.
Instead, keep your ginger somewhere warm and give it time to develop more obvious buds.
If the rhizome seems particularly dry, you can briefly soak it in water before planting. Afterward, remove it rather than leaving it submerged indefinitely.
Warmth is one of the most important factors.
Eventually, healthy buds should become more noticeable and may begin turning pale green.
✂️ 3. Divide Large Rhizomes
If you have one large piece of ginger containing several healthy buds, you can divide it into multiple planting pieces.
Cut it with a clean knife so that each section contains at least one or two promising growth buds.
Don’t immediately bury freshly cut ginger.
Allow the cut surfaces to dry and callus for a day or two in a clean, airy location. This can reduce the chance of freshly exposed surfaces rotting after planting.
If your rhizome is already small, there’s no need to divide it.
🪴 4. Choose a Wide Container
Ginger develops horizontally beneath the soil, so width is particularly valuable.
Choose a wide container with drainage holes.
A shallow-but-wide container can often be more useful than an extremely deep, narrow pot.
Whatever container you choose, drainage is essential.
Ginger enjoys moisture, but that doesn’t mean it wants to sit in permanently waterlogged soil.
Terracotta can look beautiful, although it may dry faster than some other container materials.
🌿 5. Prepare Rich, Well-Draining Soil
Fill your container with fertile, loose potting mix that drains effectively while still retaining some moisture.
Adding well-finished compost can provide organic matter.
Avoid filling containers with dense backyard soil alone. Heavy soil can become compacted inside pots and may drain poorly.
Your goal is soil that remains comfortably moist without becoming swampy.
Before planting, lightly moisten the potting mix.
🫚 6. Plant Ginger With the Buds Facing Up
Place your ginger rhizome horizontally in the container with its healthiest buds facing upward.
Cover it with a relatively shallow layer of potting mix rather than burying it extremely deeply.
Water gently after planting.
Don’t panic if nothing happens immediately.
Ginger can take time to wake up and begin producing visible shoots, particularly if temperatures aren’t consistently warm.
Patience is part of growing it.
☀️ 7. Give Ginger Warmth and Suitable Light
Ginger is a warm-climate plant.
It performs best when protected from cold temperatures and frost.
Place your container somewhere warm with bright light, while being cautious about suddenly exposing tender young growth to intense, scorching afternoon sun.
In hot climates, some protection from the strongest midday or afternoon sunlight can be beneficial.
If you’re starting ginger indoors, a bright window or appropriate supplemental lighting can help.
Once outdoor temperatures are reliably warm, container-grown ginger can be moved outside gradually.
💦 8. Keep the Soil Consistently Moist
Ginger likes regular moisture during active growth.
However, one of the easiest ways to ruin your crop is by constantly saturating the soil.
Check the potting mix with your finger.
If the upper layer is beginning to dry, it’s probably time to water. Water thoroughly enough to moisten the root zone, then allow excess water to drain from the container.
Never leave a drainage saucer permanently filled with water.
As the plant becomes larger during warm weather, it may require more frequent watering.
🌱 9. Watch the Green Shoots Grow
Eventually, slender green shoots should emerge from the soil.
These develop into tall stems with long, narrow leaves.
A healthy ginger plant looks somewhat tropical and can actually become an attractive container plant even before harvest.
As additional rhizomes develop underground, more shoots may emerge.
Don’t dig around the plant constantly to check what’s happening. Disturbing the soil repeatedly can damage developing roots and rhizomes.
Let the plant grow.
🌿 10. Feed During Active Growth
Container plants have access to a limited amount of soil, so nutrients eventually become depleted.
Compost can provide a useful foundation, but ginger grown for an extended season may benefit from additional feeding.
Use an appropriate balanced fertilizer according to its label rather than assuming more fertilizer means faster growth.
Overfertilizing can damage plants.
Healthy growth should look vigorous and green without being unnaturally forced.
🫚 11. Harvest Young Ginger
You don’t necessarily have to wait until the entire plant reaches the end of its growing cycle before tasting your crop.
Once the plant has been growing for several months and the underground rhizomes have developed sufficiently, you may be able to carefully harvest a small piece from around the outer edge.
This younger ginger tends to have thinner skin and a milder flavor than fully mature ginger.
Try not to disturb the main plant unnecessarily if you want it to continue growing.
🧺 12. Harvest Mature Ginger
For a larger harvest, allow the plant a long growing season.
As ginger approaches maturity, the foliage may naturally begin yellowing and dying back.
At that stage, reduce watering and prepare for harvest.
Carefully remove the plant from its container or loosen the potting mix around the rhizomes.
You may be surprised by how much the original piece has expanded.
Separate the fresh ginger, brush away excess soil, and wash only what you’re ready to use or prepare for storage.
🌱 Save Some Ginger for Replanting
Here’s where growing ginger becomes especially satisfying.
Instead of using every piece you harvest, save a few healthy rhizomes containing strong buds.
Those pieces can become the beginning of your next crop.
That doesn’t mean you’ll literally have unlimited ginger forever without effort—plants still require proper conditions and healthy planting material—but saving suitable rhizomes can reduce how often you need to purchase new starter pieces.
🪴 Growing Ginger Indoors
Ginger can be grown indoors when you can provide sufficient warmth and light.
Place the container near a bright window and keep it away from cold drafts.
Indoor air can become dry, particularly during winter, so monitor the potting mix rather than following a rigid watering schedule.
The biggest challenge indoors is usually light.
If your home is very dark, consider using an appropriate grow light rather than expecting ginger to thrive in a dim corner.
🌡️ Growing Ginger in Colder Areas
You don’t have to live in a tropical climate to experiment with ginger.
Gardeners in colder regions can start ginger indoors before warm weather arrives.
Once temperatures are reliably warm, move the container outdoors gradually so the plant can adjust to stronger sunlight and changing conditions.
Before cold weather returns, either harvest your ginger or move container plants into a protected environment if you plan to continue growing them.
Ginger should be protected from frost.
🚫 Common Ginger-Growing Mistakes
A few simple mistakes can slow down your ginger crop.
Keeping ginger permanently underwater: Ginger may sprout around moisture, but prolonged submersion isn’t the best method for producing a healthy edible crop.
Overwatering: Moist soil is good; permanently saturated soil isn’t.
Using a narrow container: Ginger spreads horizontally, so give the rhizomes room.
Planting too deeply: The rhizome doesn’t need to disappear far beneath the soil.
Expecting instant growth: Ginger takes time.
Growing in cold conditions: Warmth is crucial for active growth.
Harvesting too early: The longer healthy ginger has to develop during its growing season, the more opportunity the rhizomes have to expand.
🌿 How Long Does Ginger Take to Grow?
Ginger isn’t an instant-harvest crop.
You may be able to take small amounts of young ginger after several months, while a substantial mature harvest generally requires a considerably longer growing period—often much of a warm growing season.
Your results will depend on temperature, variety, sunlight, container size, nutrition, and overall plant health.
Think of ginger as a slow but rewarding gardening project rather than a quick microgreen crop.
🫚 Final Thoughts
Growing ginger at home is surprisingly approachable.
Start with a healthy rhizome with visible buds, plant it horizontally in a wide container filled with rich, well-draining potting mix, and provide plenty of warmth.
Keep the soil consistently moist without waterlogging it, give the plant adequate light, and allow it plenty of time to develop.
Eventually, that ordinary piece of ginger you might have purchased for dinner can become a beautiful leafy plant with a fresh crop developing underneath the soil.
And when harvest time arrives, save a few healthy pieces for planting again.